Why This Question Comes Up So Often in North Texas
Homeowners across the Dallas-Fort Worth metro often search for roofing nails when what they actually need is siding nails, and the mix-up is understandable. Both fasteners look similar at the hardware store, both have a wide head, and both get driven with a nail gun. But a roof deck and a wall of vinyl siding move, expand, and carry weight in completely different ways, so the nail built for one job is the wrong tool for the other.
Texas adds a wrinkle most of the country does not deal with: summer heat that regularly tops 100 degrees and swings 40 degrees or more overnight in spring and fall. Vinyl siding expands and contracts with that temperature swing more than shingles do, which is exactly why the fastening method for siding is so different from the fastening method for a roof. Get it wrong and you end up with buckled panels, popped nails, or siding that rattles in the wind.
What Makes a Roofing Nail Different From a Siding Nail
A roofing nail is built to grip and hold tight. It has a large flat head, usually around 3/8 inch across, that spreads load over the shingle so wind cannot pull it through. It is driven flush or slightly proud, and once it is set, the shingle is not supposed to move independently of that nail. That rigid connection is what keeps a shingle roof sealed against wind-driven rain.
Roofing Nail Specs
Standard roofing nails for asphalt shingles run from about 1 inch for a single layer up to 1.75 inches or longer when nailing through multiple layers or thicker decking. They are typically galvanized or stainless to resist corrosion from sun and moisture exposure, and shank diameter stays consistent across lengths so the holding power is uniform.
The head size and shank coating matter more than people realize. A roofing nail with a smooth shank backs out over time as the deck flexes with heat, while a ring-shank roofing nail holds better in high-wind regions. This is part of why manufacturer specifications matter on every roof replacement, not just nail choice but how and where each nail is placed on the shingle.
Siding Nail Specs
A vinyl siding nail is a different animal. It has a smaller head, often around 5/16 inch, and critically, it is not driven flush. Vinyl siding installation calls for the nail to sit loose enough that the panel can slide side to side behind the nail head as temperature changes. Length generally falls in the 1.5 to 2 inch range depending on the wall assembly, long enough to penetrate sheathing and framing, but the holding philosophy is completely different.
Siding nails are typically aluminum or galvanized steel to avoid rust streaks bleeding down a light-colored panel, and the nail is centered in the siding's nailing slot rather than driven into the panel body itself. That slot is an engineered gap, not a mistake, and nailing it tight is one of the most common installation errors on a home.
| Feature | Roofing Nail | Vinyl Siding Nail |
|---|---|---|
| Typical length | 1 to 1.75 inches | 1.5 to 2 inches |
| Head size | Wide, about 3/8 inch | Smaller, about 5/16 inch |
| Driven how | Flush, holds tight | Loose, allows panel to slide |
| Common material | Galvanized or stainless steel | Aluminum or galvanized steel |
Where Each Fastener Actually Does Its Job
On a roof, the nail is load-bearing and permanent. It passes through the shingle's nailing zone into the deck, and the shingle above it laps over the nail head, sealing it from weather. There is no expectation of movement once the nail is set, which is why placement within the manufacturer's nailing zone is checked closely on every install.
On a vinyl wall, the nail anchors the panel to the sheathing but leaves room for the panel to move. Vinyl siding is designed to hang loosely on its nails, expanding in Texas summer heat and contracting in winter without buckling. A nail driven too tight defeats that design and is one of the leading causes of wavy, warped siding on older homes.
Step-by-Step: How Fasteners Are Chosen for Each Job
A properly planned job matches the fastener to the material, the substrate, and the local climate before a single nail gets driven.
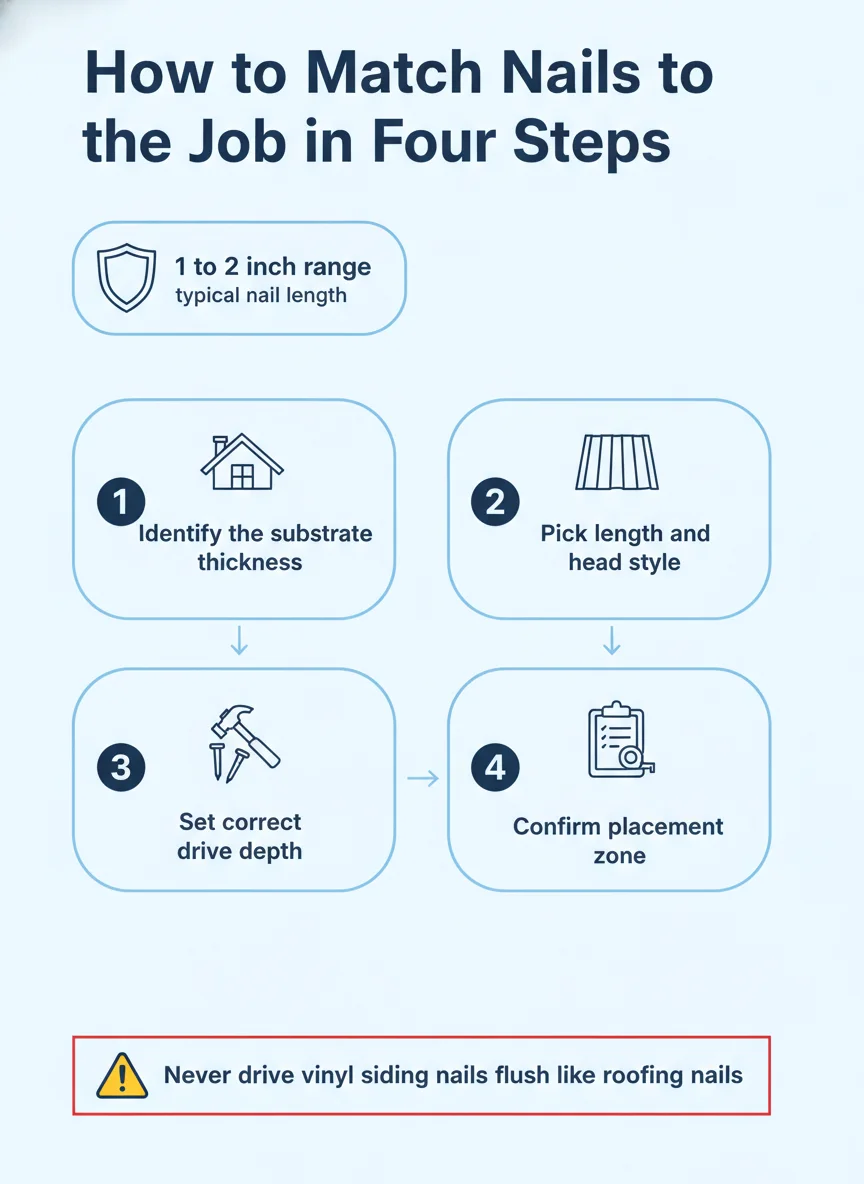
- Identify the substrate: The crew checks what the nail is penetrating, whether that's roof decking, wood sheathing, or furring strips, since depth requirements change with each.
- Match nail length to layers: For a roof, nail length accounts for shingle thickness plus any underlayment or additional layers present on a roof-over.
- Pick the right head style: Roofing nails use a wide, flat head for wind resistance, while siding nails use a smaller head sized to the panel's nailing slot.
- Set the drive depth: Roofing nails are driven flush and tight; siding nails are left with a slight gap to allow for seasonal expansion.
- Check corrosion resistance: Materials are chosen to resist Texas humidity and sun exposure without streaking or rusting over the panel or shingle surface.
- Confirm placement zone: Each fastener goes exactly where the manufacturer specifies, since placement outside the nailing zone voids warranty coverage on most products.
What Goes Wrong When the Wrong Nail Gets Used
Using a roofing nail on siding, or driving a siding nail too tight like a roofing nail, shows up fast once a Texas summer hits. Panels that were nailed flush instead of left to float will buckle, bow, or pop off the wall as they try to expand with nowhere to go.
Signs the Fastener Was Wrong on Siding
Look for wavy or rippled panels, especially on south- and west-facing walls that take the most sun. Nails that have backed out and left visible heads, or panels that rattle in wind, usually point to the wrong length, the wrong drive depth, or both.
Signs a Roofing Nail Was Set Wrong
On a roof, under-driven or overdriven nails show up as exposed nail heads, shingles that lift at the corners, or leaks that trace back to a single row of fasteners. A roof repair crew checking storm damage often finds nail placement, not the storm itself, is the root cause of a leak.
Is This a DIY Job or One for a Licensed Pro?
Small siding repairs, like replacing a single cracked panel on a ground-floor wall, are within reach for a handy homeowner who takes time to match the existing nailing pattern and leaves proper slack in each nail. The hardware is inexpensive and mistakes are easy to spot and fix before they cause real damage.
Roof work is a different category. Fastener placement affects the manufacturer's warranty, the wind rating of the install, and the water-tightness of the entire system, and getting on a roof without the right safety setup is a real risk. This is work for a licensed roofing contractor, not a weekend project.
If you're unsure which category your project falls into, a quick look from a professional costs nothing and saves you from guessing. For anything involving the roof deck itself, from full tear-offs to patching storm damage, bring in a crew that nails to manufacturer spec every time rather than eyeballing it.
Getting the Fasteners Right the First Time
Nail choice feels like a small detail until it is the reason a wall or a roof fails years ahead of schedule. Whether it's siding left to float properly in the Texas heat or shingles nailed exactly within the manufacturer's zone, the fastener is doing quiet, constant work every single day it sits in the wall or deck.
If you're seeing buckled siding, exposed nail heads on your roof, or just want a second opinion on an older install, Absolute Professional Roofing Contractors LLC can take a look and tell you plainly what you're dealing with.
Frequently asked questions
Can you use roofing nails on vinyl siding?
It's not recommended. Roofing nails are meant to be driven flush and tight, while vinyl siding needs room to expand and contract, so using a roofing nail or driving a siding nail too tight usually causes buckling.
What size nails are best for vinyl siding?
Most vinyl siding installs use nails in the 1.5 to 2 inch range, long enough to reach solid framing or sheathing behind the panel. The exact length depends on the wall assembly and panel thickness.
Can you staple vinyl siding instead of nailing it?
Staples are generally discouraged for vinyl siding because they don't hold as securely as nails and can crack the panel's nailing slot. Most manufacturers specify nails as the preferred fastener.
Why does vinyl siding need room to move on the nail?
Vinyl expands and contracts more than wood or metal siding as temperatures swing, which is common in North Texas. Nailing it loosely lets each panel slide slightly without buckling or cracking.
Do roofing nails and siding nails use the same material?
Not always. Roofing nails are commonly galvanized or stainless steel for corrosion resistance on an exposed roof deck, while siding nails are often aluminum or galvanized steel to avoid rust streaks on light-colored panels.